In this article, I’ll show you how to create an agent referral list, automatically add these referrals to your CRM or email list, and effectively promote it on your Instagram Story.
This single strategy helped me add 142 emails to my database in one day. A strong network of agent contacts is a valuable asset in your real estate career. This list not only connects you with other real estate professionals, but also serves as a foundation for generating referrals.
Creating the Agent Referral List
1. Start by using Google Docs
- Visit Google Docs.
- Create a “New Google Form” from a template.
- Click on “Contact Information Form.”
- Rename the page to “Referral Form” and add a brief description.
- On the right side, click the plus button and select “Add Question.”
- Add the question: “What area do you service?”
Note: Avoid requesting too much information to prevent user drop-off.
It should look like this when it’s finished:

2. Sharing the Form
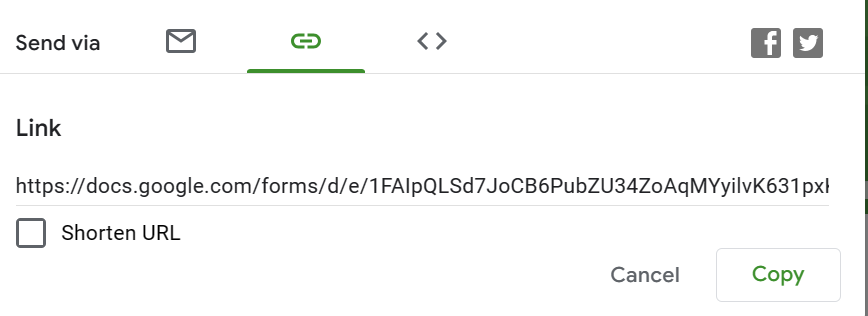
- At the top, click the purple “Send” button.
- Click on the link icon to get the shareable link.
3. Keep Track of Responses
Remember that you can always access the answers provided by respondents under the “Responses” tab.

Next, we’ll use Zapier to automatically include the ‘responses’ (agents who filled out our form) in our CRM or email list.
Head over to Zapier:
- Click on “New Zap.”
Select the Trigger:
- For the trigger, select “Google Forms.”
- Choose “New Form Response” as the event.
- Select the form named “Referral Form” or your custom name.
- Continue and test the trigger.
- Continue with the selected record.
Set Up the Action:
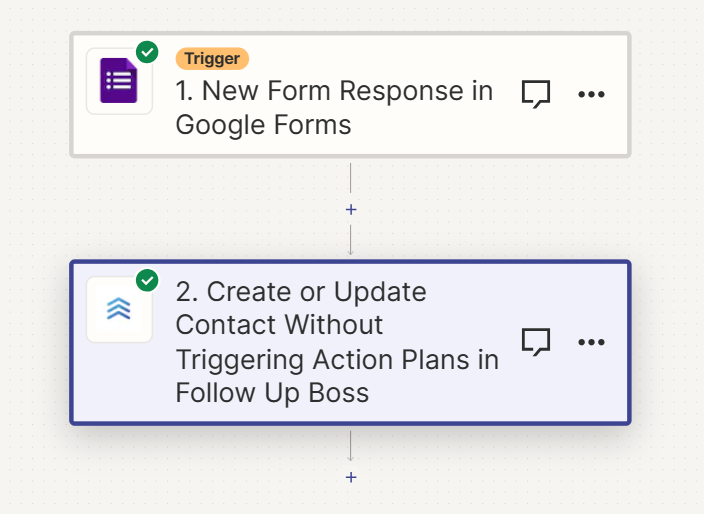
**To add agents to your CRM:**
- Search for your CRM provider (Zapier connects with various CRMs, but for this example, let’s assume you’re using Follow Up Boss)
- Under the event, select “Create or Update Contact without Triggering Action Plans.”
- Click “Continue.”
- Sign into your CRM account.
- In the drop-down, add the following:
- Name (it will show up as “Name Sample Text Question Answer”).
- Email (it will show up as “joe.doe@gmail”).
- Under “City,” add the response from the “What area do you service” question.
- Click “Continue.”
- Test the step.
- Publish the Zap.
It should look like this when you’re done:
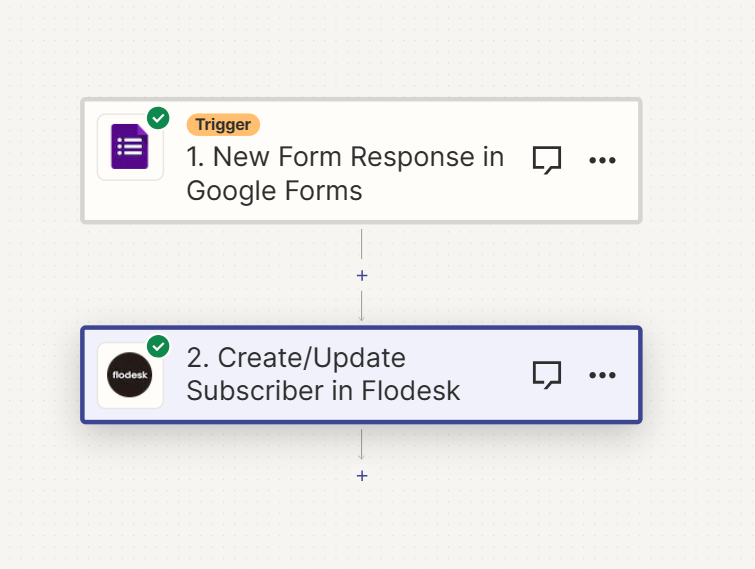
- Select “Flodesk” as the action.
- Choose “Create/Update Subscriber” from the drop-down.
- Click “Continue.”
- Choose the segment you want them to be entered into.
- Under “Email,” select the respondent’s email (e.g., “joe.doe@gmail.com“).
- Click “Continue.”
- Test the step.
- Publish the Zap.
It should look like this when you’re done:
4. Promoting the Referral Form on IG:
- Use Create Mode with a Minimalistic Background: Simplicity often converts better. Choose a black background for your IG story.
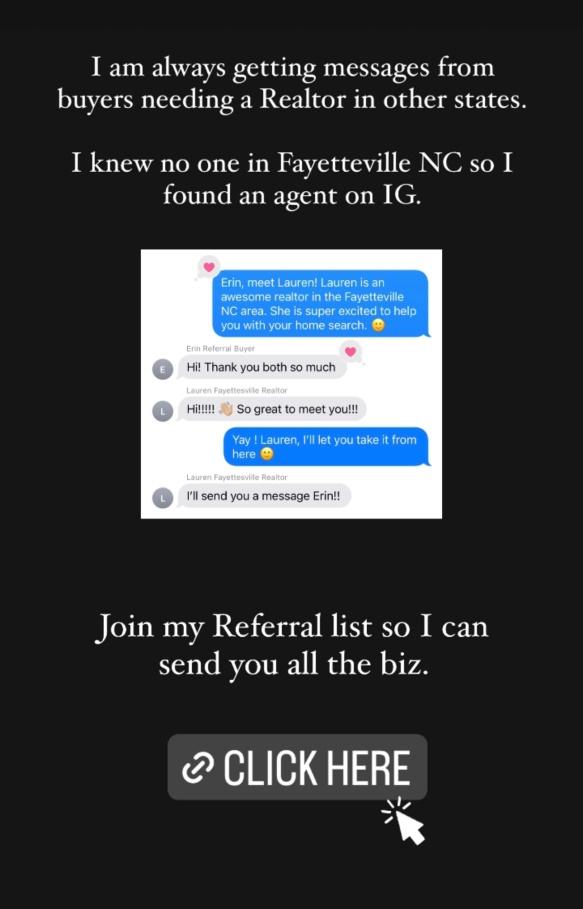
- Include a Screenshot Case Study: Showcase a referral you sent to another agent to demonstrate the value of filling out the form. This illustrates that you have referrals to offer, not just an email list.
- Add the Form Link: Include the link to the Google form in your story with a white arrow pointing to it. This direct and simple approach encourages engagement.
- Consider Multiple Stories: If you want to capture more attention, consider posting a second story immediately after the first, promoting the referral form with another case study. Some people might think this strategy is psychotic, but it works! It’s important to remember that many people quickly swipe through their stories without reading. You can reinforce the importance of your referral list by sharing another story immediately after. Don’t overuse this approach. Limit it to 2-3 times a month. You want to avoid annoying your followers and coming across as repetitive.
Here are a couple of examples: